- No hidden charges apply

All of us are quite fascinated by the technology behind ChatGPT and the potential it holds for the future. However testing ChatGPT for leisure and adopting it are two different stories. In this blog post, we will discuss the process of custom training the ChatGPT (text-davinci-003) model, including data pre-processing, training, validation, and deployment using a Flask chat app. The Advance Analytics team, Data Analytics Practice of AchieveX Solutions Pvt Ltd ( Hyperlink will be added), is receiving quite a few requests already for some proof of concepts around this technological wonder. In this blog post, we would like to give a rough sketch of our approach, which can help the community
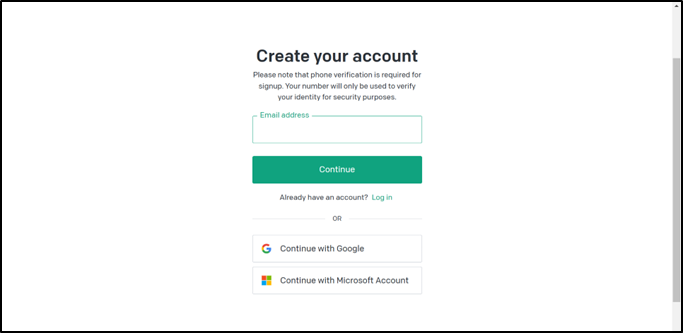
Before we get started, you will need an OpenAI API key to access the ChatGPT model. If you don't have an API key already, you can get one by following these steps:
Go to the OpenAI website and create an account.
Navigate to the "API Keys" tab in the dashboard.

Click on the "Create new API key" button.
Follow the instructions to create a new API key.
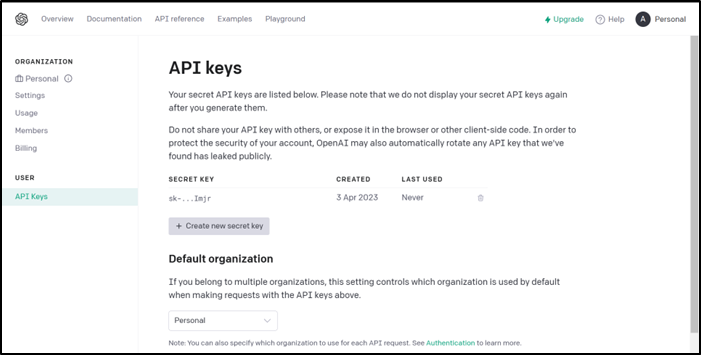
Once you have your API key, you can use it to access the ChatGPT model and perform custom training.
To create a prompt-completion dataset CSV file for custom training of the ChatGPT "text-davinci-003" model, you can follow these steps:
Once you have created the CSV file containing the prompt-completion dataset, you can use it to train the ChatGPT "text-davinci-003" model using the steps outlined in the blog post.
Let's jump into coding!
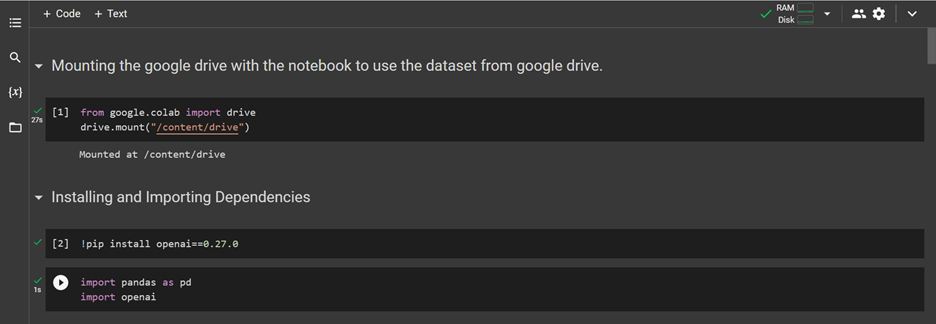
In order to ensure that the dataset used for custom chatbot training is not lost upon the end of a Google Colab runtime, it is necessary to mount Google Drive to the Colab environment. This will allow the dataset to be safely stored in Google Drive, and accessed for training purposes whenever required.
Next, we will proceed with the installation of OpenAI version 0.27.0 by utilizing the pip command. This will enable us to access the necessary tools and resources required for the successful implementation of custom chatbot training with OpenAI.
For efficient manipulation of the CSV file containing the prompt-completion dataset, we will incorporate the use of the Pandas library. This powerful tool provides an extensive range of functions and features for effective data handling and analysis, ensuring that we can effectively preprocess and prepare the dataset for training our custom ChatGPT model.
To enable access to the OpenAI API key for integration into the training process, we need to first assign the key to a variable using the following command:
"openai.api_key = "
Additionally, we must also execute the command:
"!export OPENAI_API_KEY="
to set the OpenAI API key as an environment variable within the Colab runtime environment.

Before training the ChatGPT Davinci model, it is essential to pre-process the data. The preprocessing step involves data augmentation and data cleaning.
A. Data Loading: Here, we are reading the CSV file containing the
prompt-completion dataset using Pandas library's ‘read_csv’ function,
and storing the resulting DataFrame object in ‘df’ variable.
We have also utilized the ‘skipinitialspace’ parameter to ensure that
any extraneous white spaces at the beginning of each field are ignored
during parsing.

B. Data Augmentation: HData augmentation is the process of generating additional training data from existing data. In the case of ChatGPT, data augmentation can be done by paraphrasing the input text in all possible ways. This helps to increase the diversity and robustness of the data, leading to better model performance. The augmented data can then be saved as a CSV file with separate columns for prompts and completions.
As our dataset contains a sufficient amount of data for custom chatbot training purposes, there is no need for data augmentation techniques to be implemented. We can instead proceed directly to the data cleaning.
B. Data Cleaning: Data cleaning involves the process of removing any unnecessary or irrelevant data from the dataset. This can include removing duplicate data, correcting errors, and eliminating outliers. In the case of ChatGPT, data cleaning involves removing all white spaces, removing duplicate data, and lowercasing the prompt and completion columns.
We then clean the prompt and completion columns of any white space using the str.strip() method to ensure consistency in the dataset.
In order to ensure that the prompt and completion fields in our dataset are uniformly lowercase, we have utilized the Pandas 'apply' function in conjunction with a lambda function that converts all entries in the DataFrame to strings and applies the 'str.lower()' method to convert all text to lowercase. This will help in ensuring that the chatbot's responses are consistent in style and tone, regardless of the input text.
To further clean the prompt column of the dataset, we have utilized the Pandas 'str.replace()' method to remove any non-alphanumeric characters from the text data. This is accomplished by specifying a regular expression pattern '[^\w\s]', which matches any character that is not a word character or whitespace. The 'str.replace()' method replaces any matches found in the prompt column with an empty string, resulting in a clean and uniform dataset for training our custom ChatGPT model.
In order to prepare the prompt-completion dataset for training our custom ChatGPT model, we have utilized the Pandas library to concatenate two strings to the 'prompt' and 'completion' columns respectively. Specifically, we have appended the string '" \n\n###\n\n"' to the end of each prompt entry and the string '" END"' to the end of each completion entry.
This step is necessary to ensure that each prompt and its corresponding completion are clearly separated from each other in the training data, and to help the model learn to generate a coherent response to a given prompt.
Once we have preprocessed our dataset, we can save it as a new CSV file using the 'to_csv()' method from the Pandas library. In this example, we have saved the preprocessed DataFrame as a new file named 'test.csv'. This file can then be used for training our custom ChatGPT model.
The 'openai tools fine_tunes.prepare_data' command is used to prepare the preprocessed dataset file for training the custom ChatGPT model. This command is executed in the command line interface, and takes the preprocessed dataset file (in this case, 'test.csv') as an input using the '-f' flag.
The 'prepare_data' command will preprocess the input data file and create a new output file with additional metadata needed for training, including information about the size and encoding of the dataset, as well as any special tokens used in the dataset.
Note that the 'openai tools' command line interface requires that the OpenAI API key be properly configured in order to authenticate the user and allow access to the fine-tuning tools.
After preprocessing the data, it is time to train the ChatGPT Davinci model. The training step involves fine-tuning the pre-trained ChatGPT model on the specific dataset, visualizing the performance of the model, and validating the model on the original data.
A. Fine-tune pretrained ChatGPT model(text-davinci-003):
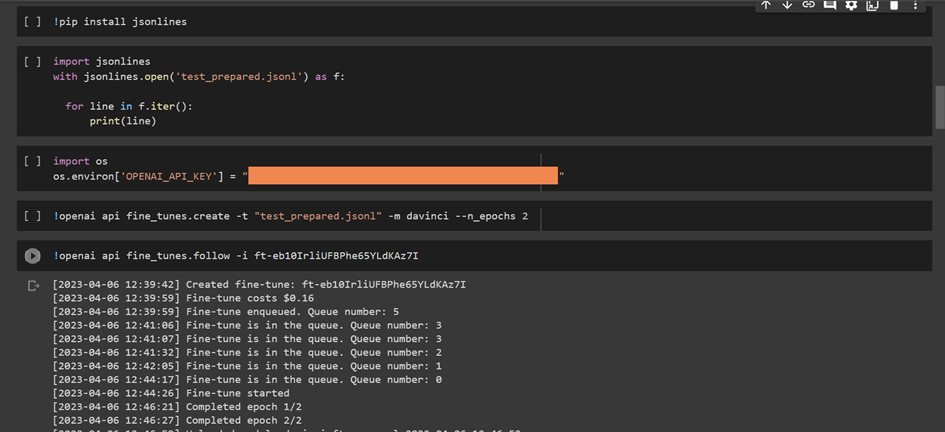
Fine-tuning involves training the pre-trained ChatGPT model on a specific dataset. This involves using the Davinci-3 engine to fine-tune the model on the specific dataset, which will improve its ability to generate appropriate responses to different inputs.
The 'os.environ' method is used in Python to set environment variables, which can be accessed by other programs or processes running on the same machine.
In this case, we are setting the 'OPENAI_API_KEY' environment variable to a string value that represents a placeholder API key. This is typically done in order to configure access to an external service or resource that requires authentication, such as the OpenAI API key that is required for fine-tuning the ChatGPT model.
This command is using the OpenAI CLI tool to initiate the fine-tuning process of the ChatGPT model using the prepared dataset 'test_prepared.jsonl'.
The 'davinci' model is being used for fine-tuning, which is the most powerful and accurate version of the GPT model family provided by OpenAI.
The '--n_epochs 2' option specifies that the fine-tuning process will be run for a total of 2 epochs. An epoch is a complete iteration through the entire training dataset.
B. Visualization: Visualization is the process of creating graphs, charts, or other visual representations of data. This can help you understand the performance of the model and identify areas for improvement. In the case of ChatGPT, visualization can be done by plotting the loss and accuracy of the model during training.
C. Fine-tune model validation on original data(prompt): Once the model is fine-tuned, it is important to validate its performance on the original dataset. This involves using the original dataset to evaluate the model's accuracy, precision, and recall. In the case of ChatGPT, model validation can be done by evaluating the model's response to specific prompts in the original dataset.

To see the working result of the generate_gpt3_response function, you can call the function with a prompt and print the result. For example:
 You can change the prompt to any text you want to generate a response for.
After the model is fine-tuned and validated, it is time to deploy it using a Flask chat app. Flask is a lightweight web framework that can be used to develop web applications in Python. To deploy the ChatGPT text-davinci-003 model using Flask, follow these steps:
Step 1: Create a new Flask project with a route for handling chatbot requests.
Step 2: Import the necessary libraries for loading the trained model and processing user inputs. Step 3: Load the trained model using the OPENAI library and define a function for generating responses to user inputs.
Step 4: Define a function to handle user inputs and return the appropriate response.
Step 5: Run the Flask app and test it by sending user inputs and receiving responses from the chatbot.
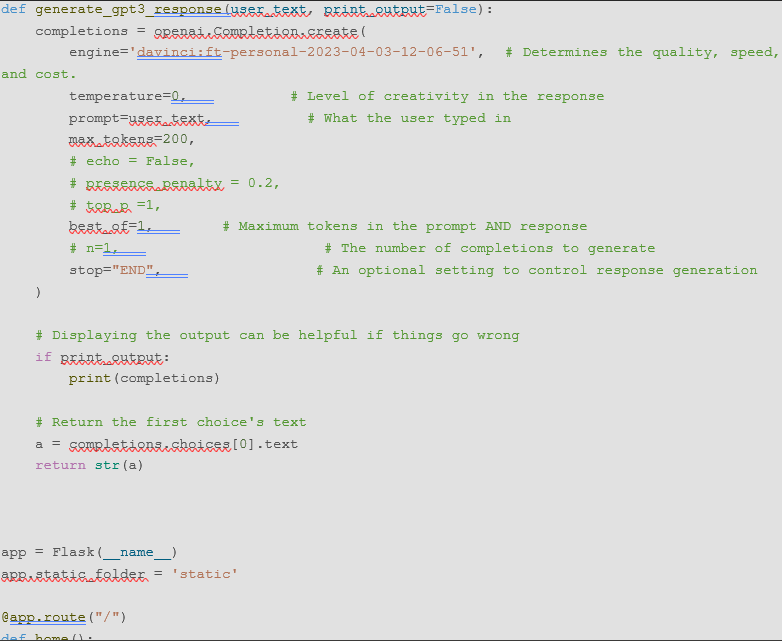
It is not necessary to have an 'index.html' file specifically for deploying a Flask app on Flux. However, you will need to have a 'main.py' file that contains the Flask app and any necessary dependencies installed, such as the OpenAI API module. You will also need to set the 'FLASK_APP' environment variable to the name of the Flask app file, in this case 'main.py', using the command export 'FLASK_APP=main.py'.
Custom training of ChatGPT text-davinci-003 model can help businesses and industries to create more accurate and effective chatbots. In this blog post, we discussed the step-by-step process of custom training the ChatGPT text-davinci-003 model, including data pre-processing, training, validation, and deployment using Flask chat app. By following these steps, businesses and industries can fine-tune the pre-trained ChatGPT model to their specific needs, and deploy it using a Flask chat app to automate their customer support and other online interactions. The use of custom chatbots can improve customer satisfaction, reduce response times, and increase productivity, making it a valuable investment for any business or industry.
© 2023 Achievexsolutions, All Rights Reserved.
auctor lectus better best conbia euismot rhoncus dolora gorgeous system.